Green Tractor Talk banner

455 Leak

51K views 27 replies 11 participants last post by  Rob R  
#1 · (Edited)
Let me start with I am an IT Director. I'm better with 1 and 0's than I am with a wrench. Not long before dad passed he got a new 1025r and I was fortunate enough to get his 455 with all the goodies (60" deck, 47" snow blower, 48" tiller, weights etc.). But unfortunately I can't call on dad's 41 years of work at the John Deere Dubuque plant and his countless hours growing up on the farm with tractors to help me with this problem. So instead of building web sites and online applications, I need to come here for some help, I hope.

The tractor is not used a lot. There are 1106 hours on it, and in the past two years I probably put 20 on it.

I came home to this after being away for a few days:


I checked the transaxle oil level and it does not appear to be low.

When I checked underneath and the leak doesn't appear to be coming from the drain plug. There is an oil drip forming to the right of the plug (when looking from behind), nothing coming from the plug itself and oil seems to be up in some places that don't make sense.

What are people thoughts on this one? Any suggestions would be greatly appreciated.
 

Attachments

#2 ·
The transmission filter is on the other side from drain plug. Just wondering does it seem dry ?

Reread your post , fluid seems to be on back side where drain plug is located. ? Trying to remember what else is on
the back side. I seem to remember a cover on backside of transmission for the rear PTO could it leaking .?
 
#3 ·
If you can, check to see if the cover(#17), for the PTO Brake, is possibly leaking. If so, remove cover, clean surfaces and apply sealant, prior to re-assembly.

Image
 
#5 ·
I think you're on to something

If you can, check to see if the cover(#17), for the PTO Brake, is possibly leaking. If so, remove cover, clean surfaces and apply sealant, prior to re-assembly.


I went out and looked along the side up where the PTO Brake cover is located and saw this:


So, it appears to this untrained eye that the cover could be leaking and getting oil on this side. I'm also assuming that when I engaged the PTO the pressure forced it out faster and thus oil is sprayed further coating that side.

So, some questions.

1. This is the tranaxle oil, correct?

2. For a rookie like me, on a scale of 1 to 10 with 1 easy, 10 take it to your local dealer, how hard is it going to be to clean and seal this part given where it's at? To me it looks like I'll have to remove the 3 point hitch, maybe the PTO cover and then maybe I can get to it without having to remove the rear PTO.

2a. One of the guys that work for me has a brother-in-law that is good at rebuilding motors and the like, operates heavy equipment, etc. Should I call in that kind of support?

Thanks for your help.
 
#4 ·
Remove the fender pan to find your leak. It is not that hard. Two bolts on both sides ware your feet rest, two bolts under the seat, remove the tail light wires (twist and pull the light bulbs out) and the seat safety switch plug under the seat. Remove the fuel cap and lift off the fender pan. Then you will see the fuel tank with hoses and wires taped to the tank. The tank is not bolted down at all. Unhook hoses and push wires and hoses off to the side and the leak will be present.

Their are a lot of gaskets and seals that the transmission has such as; PTO, Diff lock, Forward and reverse linkage, brake linkage and so on.
 
#6 ·
Thanks for that advice... as you can see in my other post I found this:


I'll look at taking the fender pan off.
 
#7 ·
From 1 to 10: I give it a 7. Other opinions will vary and are welcome over mine.
If I were you; I'd suggest you take it to someone to have more that that one replaced with new oil and filter. The price of the parts are fairly reasonable and just get a quote for labor. Those seals and gaskets are the weakest link to that rear transaxle.
 
#8 ·
What I've found

I took the fender pan off. Yes, it was pretty simple. The leak appears to be coming out the top by the Solenoid Hydraulic Valve.


I had found this video:

And in the description it referenced part number: AM878422

I went to green-parts-direct.com and found the part which now has a new number: JDM811683

I've ordered that part and a new filter. When it arrives I'm going to put in the new part and change out the oil with TY22000 Low Viscosity Hy-Gard Transmission and Hydraulic Oil.

This seems like a reasonable first step based on what I saw. Anyone think it could be something else?

Thanks for the help.
 
#25 ·
I took the fender pan off. Yes, it was pretty simple. The leak appears to be coming out the top by the Solenoid Hydraulic Valve.
View attachment 43302

I had found this video:

And in the description it referenced part number: AM878422

I went to green-parts-direct.com and found the part which now has a new number: JDM811683

I've ordered that part and a new filter. When it arrives I'm going to put in the new part and change out the oil with TY22000 Low Viscosity Hy-Gard Transmission and Hydraulic Oil.

This seems like a reasonable first step based on what I saw. Anyone think it could be something else?


Thanks for the help.
Thank you for this. When I took the fuel tank off of my new to me 455 this valve had been replaced by a bunch of chewed up acorns and gunk, I was not happy. But I remembered this post and knew I was looking at a bad picture. I used the shop vac to clean the area and ordered a new vent. Vent installed, fluid and filter changed and all seems well in Millville. Very pleased with this tractor so far.I will use this thread in the future as needed. Thanks
 
  • Like
Reactions: BigJim55
#10 ·
I'm having a similar issue with my 455 and it's cold as well. I get fluid coming out of the vent and even tried to replace the vent valve. Once I get a chance I am going to dig a little deeper.
 
#11 ·
I can tell you that the 445 /455 commonly develop leaks between the two transaxle case halves. The factory uses a sealant when they assemble them and over time, they leak. Mine is about to be torn down this week. I am doing the work myself.

I plan on doing a detailed pictorial of the entire process as this happens often to these tractors, as much based upon their age as the hours on them. The dealership quote to repair this was about $1,200 to $1,600 in labor and $200 in parts, depending upon what it needs once split. Their quote for the $200 in parts was ONLY replacing the seal between the transaxle halves and new fluid and filter. The seal is actually sealant in a tube which you apply to the mating surfaces when putting them back together. There is NOT an actual gasket for this area.

I plan on putting new axle seals and replacing the axle bearings as well as the output shaft bearings and seal. Essentially, if it has a seal or gasket on the way to split the actual case, I am replacing it. I am also replacing the steel gasket between the hydro pump and the transaxle housing as since I am right there and I have it torn down, it seems like the time to do it to me.

If I were you, while you have the body off your tractor, I would buy the new fuel pick up filter / screen from the dealership and replace it while you have the body off. It is very easy to do and the electric fuel pump is submersed in the diesel tank and the pick up screen which goes onto the fuel pump pick up tube simply slides on. Those screens are usually quite deteriorated and gummed up. It is an investment of a few dollars while you are there and it could save you headaches down the road. Pulling the fuel pump is very easy to accomplish. The retention ring is easily loosened by hand or tapping with a hammer and punch.

The fuel screen part number is M111817. This is easy to do when you already have the body off the tractor. There is also an O Ring around the top of the fuel pump mounting plate where it mates to the fuel tank. This is part number M115863. If you open the fuel pump housing, make sure to replace this large o ring to achieve a leak proof seal. Your dealership parts department will know for sure.

Give me a few days and I will have a detailed step by step pictorial of the entire process which I will post on GTT. I will list every part number I use as well as the price and all of the tools necessary to accomplish the task. Stay Tuned.:bigthumb:
 
#12 · (Edited)
Here is a breakdown of the fuel pump and filter assembly for your reference. The items I am suggesting you replace while you have the body off your tractor are Number 10, which is the O ring at the top of the housing and Number 6, which is the filter assembly. Hope this helps.

If that picture above is from your actual tractor, make sure you REALLY clean things with compressed air before you open anything up as you certainly don't need any debris in anything in this entire area. Make sure once you have the area clean, you can use baby powder to locate the source of the leak. I know this should go without having to be said but I am saying it anyway......

Once you have the source of leak confirmed, I would either power wash the entire area or at least clean it thoroughly with brake cleaner. Keep in mind that if you use the power washer or brake cleaner BEFORE you confirm the leak location, it will be much harder to locate. And DONT assume that the leak is around the vent assembly only as these are commonly known to leak in other areas as well.


Here is a breakdown of the rear transaxle. Very intimidating based upon the sheer number of parts etc. but I hope to knock it down to size in my pictorial step by step.

 
  • Like
Reactions: gjohll
#14 ·
SulleyBear,

Thank you so much for this advice and I'm looking forward to the pictorial of your tear down. And the things that should go without saying... well that's just the type of thing I do need to have said. As I mentioned earlier, I'm an IT director. I'm more comfortable building web sites/web applications from the ground up than I am with doing this. It's all new to me so it's the things that you take for granted that I just don't have any practical knowledge of... like using baby powder to find the leak. So, the diagrams point to specific things and all of the other sage advice is greatly appreciated.

I took the shop vac to clean this up and then I wiped things down a bit with a shop rag. I'll blow it off with the compressor and then try the baby powder next. I'm also going to do the replacements you suggested.

One hopes that with age comes some wisdom and I've found that my book and computer smarts are all well and good (I'm making a living with them), but it's this hands-on knowledge and being self-sufficient with things like this that I've come to envy in other people. I had my son take small engines and autos 1 in high school just to start out a little further down the road with this knowledge than I am.

Thanks again.
 
  • Like
Reactions: SulleyBear
#17 ·
Welcome to this forum and I can assure you that you will find the members on Green Tractor Talk to be very helpful and provide a bunch of valuable insight. Don't tell anyone but we have a secret "Hit Squad" and anyime we find someone on the forum not being polite and "playing nice", we send the hit squad and POOF, problem solved. (Just kidding).:snipersmilie:

Seriously, this forum is a great place to get practical hands on knowledge which will build your confidence and add to your JD 455 ownership experience. Every so often we like to pick on one another, but in a friendly way, not with a mean spirit. :slap-yourself-emoti There is a incredible depth of knowledge on this site. We all learn from one another.

The John Deere 455 you now have is one of Deere's top rated and most respected Lawn and Garden tractors. Talk to anyone who really knows Garden Tractors and they will always include the 445 / 455 in the top of their list. Just FYI, the 445 is the gas motor version of the same tractor you and I have. Both are great machines. In my humble opinion, the 455 with the Yanmar diesel is superior in torque and fuel economy, but it was also about a $1,000 or $1,200 upcharge over the 445 when your father purchased this unit.

The 455 was an expensive machine when it was sold, which was from 1992 to 2001. Based upon the serial number of your tractor, you can determine it's age if you are unsure. Here is a link to some data about that tractor.

TractorData.com John Deere 455 tractor information

You will learn the hands on approach to these matters with experience. Sadly, there is often a real lack of emphasis in todays educational systems to teach a lot of the "hands on" issues which are really handy in life. A willingness to learn as you have about these issues is a great way to start. You have certainly done a good thing by having your son take the small gas engine and auto repair courses through his high school. This will be knowledge he will use throughout his life in many practical ways.

I hope to start my tear down tommorow and I am going to take pictures as I go. I plan on posting daily, if possible so the thread stays current. While I am also going to also do several other projects to this 455 as I am working on it, I will also document those steps as well. Welcome to the GTT family and I hope you find our family helpful to your tractor issues as well as being a joy to be around. Take care. Oh and of course

:wgtt:
 
#16 ·
Oh, yeah. No doubt about that. Dad had this for 20 years and I don't think he ever had this apart like this. I wanted to show things how I found them and go from there.
 
#18 ·
Well, the one thing dad did do well is keep documentation. I've got all the original manuals along with some of his notes. I even have the original dealer quote.


As you can see his employee discount, the Deere Season discount and the trade-in of his JD140 made a big difference in the final cost back in 1993.

Thanks again for the welcome and I look forward to getting to know people around here.
 
#19 ·
GJOHLL,
I may have found something which will save you a ton of work and will be relatively easy to fix if your tractor is doing the same thing as mine, which is quite likely.


If you look very closely at the picture, the shaft to which the differential lock pedal linkage attaches has a seal which in my picture, is out of position where it should be by approximately 1". The seal should be flush in the recess portion of the housing. This is the source of my leak, but to be honest, Had I not powerwashed the tractor and then disassembled the tractor and powerwashed the entire trans axle again, this wouldn't have been easy to spot as it was caked with gunk from the oil leaking and then picking up grass, dirt and you name it.

Go on the left side of your tractor (port side if you are a boater) and follow the linkage back from the differential lock pedal and you will see where it connects to the transaxle housing linkage. It is on this shaft where the seal is located. If will be obvious when you follow the linkage.

The shaft seal is part number M806040. Perhaps, It could be replaced with the transaxle in the tractor and it would require the body to be removed as you have and perhaps a few other things to really reach this. I am not sure if there is enough room when the transaxle is installed to remove the linkage and then get the new seal installed on the shaft.

This seal works loose when the Differential Lock Pedal, which is shaped like a "button" is pushed with your left foot. It makes sense why this would happen in the winter because the fluid is thick when cold and the plowing and snowblowing causes us to use the differential lock much more often than mowing because of the tire spin and traction issues.

I will also tell you that the relief valve assembly was completely gone from my tractor, which is on top of the transaxle and to the right of the fill tube when you are standing behind the tractor facing the steering wheel. Where it went is anyone;s guess but that was also a source of some small fluid leaks, but nothing like the leak from the seal which was for all practical purposes "missing" as it does nothing when slid that far out on the shaft.

You could try to reposition the seal and tap it carefully in place with something with a blunt tip so as to not tear or damage the seal. I would NOT use a screwdriver as you could easily ruin the seal and not even know it. Use something without a sharp point to persuade it back into place. I don't see what it could hurt.

You may want to use some silicone around the exterior edge of the seal ONCE YOU HAVE PUSHED IT BACK INTO PLACE. Do not silicone the seal around the shaft as it will only cause the seal to spin out of the location as you push the Differential Lock pedal which is shaped like a button. So you could try that as a simple repair to see if it solves the issue. Removing the body and tank to get to it is very easy compared to the effort necessary to remove the entire transaxle. Take that as a FACT from someone who has just removed their entire transaxle assembly.

The pressure relief valve, should yours also be missing is John Deere part number M811683, which is the current number as it supersedes the original part number. My dealer had both of these parts in stock. I didn't even ask the price as they certainly aren't going to be expensive.

I suggest you start with this issue and see if that is a source of your fluid leak. I would be surprised if it wasn't. So far, the case gaskets on my Transaxle do NOT appear to be leaking, but I plan to replace them as well. I have been taking photos of every step which I plan to post when I reassemble.

I see no evidence that my transaxle axle seals have leaked nor is there any sign that the axle bearings need any replacement. The axles in mine have no slop or end play and the bearings look like new. I am not going to press the axles out of the housings to put new seals in because if there is a need to do this in the future, I can remove the axle housings and axle assemblies with the tractor assembled. Frankly, I could pull the axles out of this tractor once together in less than an hour for both, so I am not going to disassemble those any further. You may notice in my picture that the axles have been seperated from the transaxle so I am going to put new gasket goop between the housings and assembly when I reassemble them.

I certainly hope that this is the source of your transaxle fluid leak. It will be easy to address if it is. Please let me know what you find. Take care.:bigthumb:
 
#20 ·
I have some more updated information for you regarding the 455 leak(s). While I plan on doing a detailed step by step posting with part numbers and tools required, I would like to share some interesting things I have found in my project.


The first photo is a picture of the differential shaft linkage and the seal which is out of place. To correctly install the seal the rear portion of the linkage must be removed which requires removing (2) 12 mm BOLTS to remove the bracket which is bolted to the trans case. You also have to pull the cotter pin and remove linkage and the pin and bracket to gain unrestricted access to the shaft for ease of installing the new seal.

I also removed the spring clip and pulled the front pin and linkage to gain complete access. I do not know if this can be accomplished while the transmission is still in the tractor. It would be much more difficult access when compared to having the entire transmission sitting on your work bench.

Once the old seal is removed and the seal recess cleaned, I put a touch of hydro fluid on the differential locking shaft and slid the new seal in place. I seated the seal using a 15mm deep well socket and a soft impact hammer.I could get the old seal in and out of it's place very easily while the new seal definately is seated correctly and in place where it should be.

My second photo is of the new and old seals, side by side. It is amazing how much of the old seal was worn away and the measurable difference in the I.D. of the seal where it rides on the differential shaft. While I have seen some discussion where people have suggested just putting the old seal back where it belongs "with a screwdriver", which I think is a terrible idea, when you see the actual wear on the seals, installing a new one is certainly the right approach.
 
#21 · (Edited)
I have some more updated information for you regarding the 455 leak(s). While I plan on doing a detailed step by step posting with part numbers and tools required, I would like to share some interesting things I have found in my project.

View attachment 43601 View attachment 43602

The first photo is a picture of the differential shaft linkage and the seal which is out of place. To correctly install the seal the rear portion of the linkage must be removed which requires removing (2) 12 mm BOLTS to remove the bracket which is bolted to the trans case. You also have to pull the cotter pin and remove linkage and the pin and bracket to gain unrestricted access to the shaft for ease of installing the new seal.

I also removed the spring clip and pulled the front pin and linkage to gain complete access. I do not know if this can be accomplished while the transmission is still in the tractor. It would be much more difficult access when compared to having the entire transmission sitting on your work bench.

Once the old seal is removed and the seal recess cleaned, I put a touch of hydro fluid on the differential locking shaft and slid the new seal in place. I seated the seal using a 15mm deep well socket and a soft impact hammer.I could get the old seal in and out of it's place very easily while the new seal definately is seated correctly and in place where it should be.

My second photo is of the new and old seals, side by side. It is amazing how much of the old seal was worn away and the measurable difference in the I.D. of the seal where it rides on the differential shaft. While I have seen some discussion where people have suggested just putting the old seal back where it belongs "with a screwdriver", which I think is a terrible idea, when you see the actual wear on the seals, installing a new one is certainly the right approach.
Parts were back ordered so they just shipped today. Going to check that seal and try the baby powder Saturday.
 
#22 ·
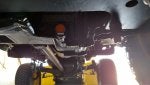
Here are some other interesting things I have noticed about the sources of leaks on the 455 transaxle case.

First and foremost, while I do have much more experience than the average tractor owner having built race cars from tubing and sheet metal to having completed a wide range of automotive repairs including engine rebuilds, transmission replacements, 3rd member set ups and a range of ignition, wiring, carb and fuel projects, building race engines, etc., I am not a professional mechanic.

However, I do own a "real bitc-hin set of tools" and no, my father was not a television repair man (movie Fast Times at Ridgemont High reference). Here is my primary tool box of 3 which I have in my workshop. The other two are Craftsman Roller Cabinets mostly with repair items like all adhesives, rolls of wire and connectors, corded tools, etc.


Being organized and having a clean working environment is very important so I set up some aluminum work tables I have and covered them with hospital surgical cloths which I happen to have many of. I set up two of these tables, one for the actual working on the parts and the other for setting up a notebook computer and having the technical manuals handy, kind of my shop desktop.


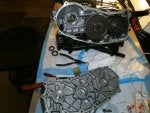
I have to admit that as I studied all of the technical service manuals and the parts diagrams of every transaxle and hydro component, I became concerned that maybe I was undertaking something I would regret. The truth is, this has been much more straight forward and logical than I thought it would be. I have now opened up each side of the transaxle and I am replacing all seals, gaskets and checking everything for any signs of wear. I am not opening up the brake section of the transaxle as I have no reason to and it is rarely used so I doubt it is worn.

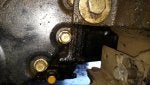
Thus far, I have found some signs of the sources of the leaks, including the seal out of place and the top vent was completely missing. But I have not encountered anything which I would consider "difficult" or that even required me to reference the manual to be able to reassemble it or disassemble it for that matter.

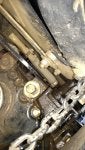
When you look at the parts diagrams of the hydro units and all of the valves and springs and checkballs, etc., it looks like it could easily turn into a mess. But in reality, for the most part, the multitude of parts are confined to very small areas. The major disassembly which occurs for pulling out the various gears, support bearings and seals is very straight forward and logical. I have disassembled the rear unit, other than the actual hydro valves themselves, and while I have a table full of parts, I have no doubt I can reassemble it without even looking at the parts diagrams and service manuals.

The engineers at Tuff Torque obviously built this unit to be very strong yet it's assembly is proving to be quite straight forward. If you have ever disassembled a 3 or 4 speed manual transmission from the 50's thru early 80's, this reminds me of the logical structure which those units also have.

I guess the message which I want to make sure those of you following this gain from my experience is that if you have decent mechanical skills, a reasonable collection of tools (internal and external snap ring pliers, torque wrenchs in Neuton Meters, metric wrenchs and sockets and some small tools for correctly removing gaskets and seals) then you should be able to handle this project.

Take pictures of each step before you disassemble it so you have a reference. Keep your bolts and parts organized as you take them off so you can easily locate them. I have my wife save cool whip plastic bowls and such thru out the year and after she pulls them from the dishwasher, I put them in a cabinet in my shop. That way, as I am disassembling something, I use a seperate bowl for each item. I have one for body hardware, one for the wheel bolts, one for the axle bolts and so on. I mark them on the inside edge with a black marker so as I handle them, I don't smear the writing.

It is just a logical process and an organized one. I power wash each part as I disassemble them and then once clean, I repaint each part before or during it's reassembly. This adds a lot of time to this but I am not doing this job on a flat rate labor basis. I am restoring my tractor as I repair it so when I am done, it will look like new. If you simply want to repair it, then no need to bother with the extensive cleaning and painting like I am doing. I am even painting the rear wheels after I cleaned them and then scuffed them up with 220 grit sandpaper to hold the new paint. So I am not documenting my hours on this project but I do have a good idea of the total time necessary to facilitate the transaxle rebuilding.

I will keep you posted. If anyone needs a specific photo of anything inside the transaxle or otherwise in the proect let me know and if I don't have it, I will see if I can get it for you. Already, I have taken over 75 different pictures to document this step by step but also to have before and after pictures. I am going to take a good hard look at the body tomorrow and decide whether I want to paint it myself or send it out to a body shop for them to paint and apply clear coat.

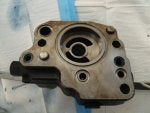
Let me know if you have any questions or if I can provide insight on this project. So far, I am very pleased with the way it is going and the specific leaks which I have found and repaired. Check out the appearance of these PTO Mid output shaft seals, new and old. It is interesting how much of the iside wear edge of the seal actually wears away with use..


Tomorrow's another day.
 

Attachments

  • Like
Reactions: BigJim55
#23 ·
A little over a year ago, I had to replace the pump motor gaskets, so I optioned to replace the gaskets and the other seals that you guys are finding that leak with age. If you are gonna do a complete seal and gasket change; it would be wise to remove the trans axle from the tractor. I simply removed all of the linkage first, then loosened the 4 bolts on the frame. I used a come-a-long from the rafters to lift the frame off the axle; then rolled/skidd the axle out with its own wheels. Set the frame on jack stands when it is out.

Just a heads up from my mistake:
When you remove the "center valve block" from the casing; their will be a 1/4" or so brass pump valve plate. Know what way that is in their as it comes out. As I took mine out, it vacuum like stuck to the machined surface till I put the motor on the bench and fell off on the floor and spun like a quarter. So I looked at the wear marks on the surfaces to figure it out how it went back together and I was wrong during reassembly (after 3 times). I had nothing for wheel movement on jack-stands. So a suggestion would be to have a friendly partner to watch things as they come apart.

Just another side note;
To find out what I done wrong, I took it to a mechanic that works on hydraulic transmissions. His labor rate was $55.00 compared to Deere's rate of $95.00+. With my mistake to repair, a new relief valve that was warn (around $150) and the steering valve that I had him reseal with new O rings came to around $650.00.

Also if you are going to remove the trans axle from the unite, that is a great time to replace the 10 cent o rings in the steering valve.

Repairing these leaks doesn't require a brain surgeon or a rocket scientists to do. I had a line of poor luck when I done this project. We were asked from 1 to 10 and I gave it a 7 not to discourage anyone to work on it, but to be more alert and take some time doing so. A big "clean" area that is well organized is a must. I also believe that the " K92 Tuff Torq" service manual suggest that you use a paper to work off of.

Good luck to everyone that is gonna voyage on this project.
 
#24 ·
Mine was leaking in the same place as Sulleybear's

Hey Sulleybear, I had a chance to do a bit of work on my 455 and remembered your post on the rear end leak. I found the exact same issue that you did with the dif lock seal pushed out. An epidemic me thinks. Thanks for the post as it pointed me in the right direction.:bigthumb:
 

Attachments

#26 ·
Hey Sulleybear, I had a chance to do a bit of work on my 455 and remembered your post on the rear end leak. I found the exact same issue that you did with the dif lock seal pushed out. An epidemic me thinks. Thanks for the post as it pointed me in the right direction.:bigthumb:
Glad you found my post helpful. Amazing how effective the Hydro Oil is at making dirt stick to everything it gets on, isn't it?

Since I use mine extensively for plowing and blowing snow, I am on that Diff Lock pedal more in one day of winter use than probably the entire summer of use. Knowing how that Diff Lock system works, everytime that pedal is pushed and the seal begins to exit it's correct location, the fluid loss increased. What started as a drop here and there for me mid winter turned into an unacceptble fluid loss in a hurry.

It's just not in the easiest location to replace when the tractor is assembled with the frame rails right there, but I dropped the entire transaxle out and didn't have any constraints when putting the new seal in place.

Thanks for recognizing my post and I am glad I could help.:bigthumb:
 
#28 ·
@SulleyBear Thank you.

My 445 (purchased new in 1997) had its first hydro leak last winter. Just 1-2 drops each time I plowed snow, no noticeable use of fluid on the dip stick, no good way to trace because it was so small of a leak in an unheated shop in Wisconsin in the winter if I did not have to (430 available to more snow too). As we all know, leaks only get worse over time.

Normal spring cleaning to get road salt off, etc., fender deck off, washed and soaped everything, dried, ready to mow. Mowed each week and no leaks ??? Not sure why. Then 1-2 drops on the floor again...obviously the same slow leak! Two weeks ago, when I went out to mow, there was a puddle under the rear of the tractor. Fender deck off, wash, dry, coat in baby powder, start when on blocks. Fluid flowing slowly out the right side where the hydrostat foot-pedal controls connect. $3 of O-rings and a few hours and all looked good. My son (Ag Engineering student) has smaller hands and better eyes than I do...helped a LOT).

Somewhere in the process, I must have nocked the pressure relief valve off and not noticed it. Tractor back together but leaking again...this one was easy to find. 2 hours of mowing and it was down about 1/2 quart of fluid, dripping on the left. Fender deck off again, more simple-green (degreasing soap), more elbow grease, baby powder leaking out of the differential lock, seal visibly loose...screw driver and 10 seconds...it moves VERY freely in and out...looks like this is the thread.

It's Sunday so next week I will pickup a new seal and continue the adventure.

As this is the only the second problem this tractor has had in 24 years and almost 1,000 hours, seems like a simple fix. The first was at about 500 hours (out of warrantee) when the nylon cam shaft gear died...$1,500 at Deere for that one.

Thanks again all who contribute here!