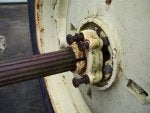
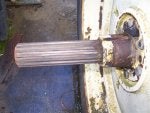
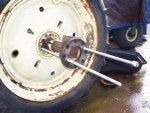
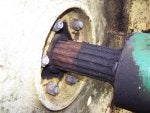
Green Tractor Talk banner
41 - 60 of 72 Posts
Yea, that one has seen some wear! Interesting how one spline is wore worse than the others....

Hopefully you get lucky in finding someone that can fix that for you!
 
  • Like
Reactions: Cjet69
Just a thought here but I think you would be better off taking all of that brazing off and having a mobile welder TIG stainless on the splines. Stainless has a lower melting point when welding and wouldn't cook your seals etc. If your worried about the heat, insulate the block with clay, but I doubt you'll need to. After they TIG stainless on, you could file the spines back... or a better thought, get a broach that is the same as your crank, have the welder TIG stainless on 3 of the splines, broach those, then repeat the process again...

Proof a good welder can work magic... these are 1/4" dowel pins that were broke off 1/4" below the surface. I built up with stainless and used a slide hammer to get them out. Above them is a aerosol spray straw for scale.

EDIT: These were in blind holes, the toolroom supervisor and foreman wanted to EDM them out. They didn't think I could get them out how I did...
Image
 
Just a thought here but I think you would be better off taking all of that brazing off and having a mobile welder TIG stainless on the splines. Stainless has a lower melting point when welding and wouldn't cook your seals etc. If your worried about the heat, insulate the block with clay, but I doubt you'll need to. After they TIG stainless on, you could file the spines back... or a better thought, get a broach that is the same as your crank, have the welder TIG stainless on 3 of the splines, broach those, then repeat the process again...

Proof a good welder can work magic... these are 1/4" dowel pins that were broke off 1/4" below the surface. I built up with stainless and used a slide hammer to get them out. Above them is a aerosol spray straw for scale.
Image
That's a nice job right there. lol
 
  • Like
Reactions: JDSwan87
Discussion starter · #45 ·
I may have found a used crankshaft for the A. Got some pics and it looks to be in good condition. I think I will just order it. I guess we will know for sure when it arrives. Shipping should take a week to 10 days.
 
Discussion starter · #46 ·
The crank shipped out yesterday. Tracking show's it should arrive next Wed. 20th
 
  • Like
Reactions: BigJim55
Discussion starter · #48 ·
  • Like
Reactions: BigJim55
Discussion starter · #49 ·
Got a package delivery. Splines look good and the drive disc fits tight. I did a quick measure on the rod journals and they are at the edge of the wear limit, but should work. Now I need to get the tractor inside or under cover so I can work on it.
 

Attachments

  • Like
Reactions: BigJim55
Discussion starter · #51 ·
You don't realize how big these crankshafts are until you get them out of the tractor and have to handle them. It measures just shy of 3 ft long and the shipping weight was 120 lbs.
 
  • Like
Reactions: BigJim55
A two man sized crankshaft for sure. It will feel even heavier as the old one is removed and the new one installed. Be sure to get a strong friend and two pair of thick leather gloves for that day. Hopefully you already have a hoist to assist with the flywheel and crankshaft. If I were there, I'd love to help but not much-a-count for the heavy stuff any more. But I'll watch!

tommyhawk
 
Discussion starter · #53 ·
I've noticed that gravity gets stronger the older I get. We have an engine hoist and if I can clear out enough in the shop we have a small bridge crane.
 
  • Like
Reactions: BigJim55
Got a package delivery. Splines look good and the drive disc fits tight. I did a quick measure on the rod journals and they are at the edge of the wear limit, but should work. Now I need to get the tractor inside or under cover so I can work on it.
:bigthumb: boy i sure wished my model 50 had that new clutch in ur 2nd pic installed on it. it needs all that i'm afraid, as yrs ago, i replaced just the clutch disc. it solved the problem back then, as i had no extra money to tear into it the right way. good luck with the install, i'll be following along with ya. enjoy ur pics :good2::munch:
 
  • Like
Reactions: GWT3046r and Cjet69
Discussion starter · #55 ·
:bigthumb: boy i sure wished my model 50 had that new clutch in ur 2nd pic installed on it. it needs all that i'm afraid, as yrs ago, i replaced just the clutch disc. it solved the problem back then, as i had no extra money to tear into it the right way. good luck with the install, i'll be following along with ya. enjoy ur pics :good2::munch:
Hopefully I don't find too many more parts to buy. I think I will need the bearing and bushing in the clutch/belt pulley and maybe a few gaskets.
 
Discussion starter · #56 ·
Had some time in between rain showers to do some work on the A. One of the first thing's I needed to do was move the right rear wheel out far enough to remove the clutch pulley. Had to use some heat on the clamp ring to get it to move. After removing the clamp I wire wheeled the axle and rigged up some threaded rod to pull on the hub. The hub slid easily on the axle which I was not expecting. Had to stop for another rain shower so I will finish moving the wheel assy later.
 

Attachments

Discussion starter · #57 ·
Slid the wheel assy. out far enough to pull the pulley off. Decided since I had the puller setup in hand I would go after the left side also. The clamp ring wouldn't budge even with heat using the original push bolts. I set up the threaded rods and used my 10 ton porta power. Put a good load on it and then applied heat. I wish I had the video camera going when it came loose because the whole setup flew off the axle and onto the ground. I expected it to jump, but not that much. Anyway the clamp ring is off and now to see if the hub will slide on the splines.
 

Attachments

]Slid the wheel assy. out far enough to pull the pulley off. Decided since I had the puller setup in hand I would go after the left side also. The clamp ring wouldn't budge even with heat using the original push bolts. I set up the threaded rods and used my 10 ton porta power. Put a good load on it and then applied heat. I wish I had the video camera going when it came loose because the whole setup flew off the axle and onto the ground. I expected it to jump, but not that much. Anyway the clamp ring is off and now to see if the hub will slide on the splines

Boy they can be a pain. Took me two days of steady work, heat, coke, Hagen brew, beating to get my one side to move. :good2:
 
Discussion starter · #59 ·
Boy they can be a pain. Took me two days of steady work, heat, coke, Hagen brew, beating to get my one side to move. :good2:
I have the ten ton porta power on the hub now and its not moving. Time for more heat I guess.
 
You bet the collars and hubs can be a pain to loosen after setting for several years. Back in the day when a 1949 "B" was our one and only farm tractor, it always worked just as it should. Moved the wheels in for plowing, left them that way until time to move them all the way out for the cultivators. Usually stayed that way until next Spring unless we wanted to do some Fall plowing.
I had no idea that they could ever get stuck so solidly until my son brought home a 1950 "B" that had been sitting for twenty plus years. You can't buy more fun than that!

tommyhawk
 
41 - 60 of 72 Posts